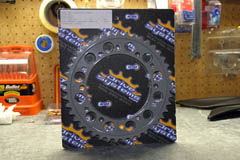
Honda CBR 1000RR AFAM Anodized Aluminum Alloy 43T Rear Sprocket
June 2006
I'd been reading about the benefits of gear changes over at www.1000RR.net and was interested in making some changes to my bike in this regard. I also noticed that on the 2006 1000RR Honda went up one tooth on the rear sprocket from the 41T on 2004-2005 models to a 42T in 2006. Most people were dropping one tooth on their front sprocket going from a 16T to a 15T. However, the aftermarket front sprockets do not have the vibration dampening material that the stock front sprockets have. It's slightly easier from a labor perspective to drop one tooth on the front sprocket versus going up in the rear, but some folks complained of increased vibration from aftermarket front sprockets due to the absence of the vibration dampening material. Dropping one tooth on the front sprocket is the same as going up 3 teeth on the rear sprocket so I decided I'd try a compromise and go up 2 teeth on the rear and use a 43T sprocket. My rationale was that I'd retain the smoothness of the stock front sprocket, I'd lighten the bike by using an aluminum alloy rear sprocket, I'd shorten the wheel base slightly which would improve turn in, I wouldn't loose much top end speed, and I'd be able to retain my stock chain. My stock chain and sprocket had 5900 miles on it. Normally I'd recommend changing the chain and sprockets all at the same time, but I've taken immaculate care of my chain, lubing and cleaning it every 500 miles so I should be fine continuing to use the stock chain with the new sprocket. I went with an AFAM anodized aluminum alloy sprocket (P/N 11616H-43) weighing 0.74 lbs (0.34 Kg) which shaved 0.52 lbs (0.24 Kg) from the bike.
Stock 41T Rear Sprocket............................................1.26 lbs (0.57 Kg)
AFAM Anodized Al Alloy 43T Rear Sprocket..........0.74 lbs (0.34 Kg)
Installation is easier than it may first appear. Removing the rear wheel is fairly easy, especially if you have a second set of hands to help out. Start by loosening the 12mm lock nuts and drive chain adjusting bolts on each side of the swing arm. Next loosen the 32mm rear axle nut. Use a rear stand to support the rear wheel off the ground and remove the axle nut, washer, and drive chain adjusting plate. Push the rear wheel all the way forward giving as much slack in the chain as possible. Derail the drive chain from the sprocket and remove the rear axle by pulling it out the left side. The rear brake caliper sets in a slot and is supported by the rear axle. The caliper is not bolted to the bike so be careful that it does not fall from its bracket and scratch up your wheel when you pull the rear axle out. Once the axle is out, you can maneuver the rear wheel out the rear of the swing arm.
With the wheel removed, remove the six 10mm nuts, bolts, and washers that connect the stock sprocket to the driven flange. Be careful as the driven flange just rests in the wheel and can fall out. Also, the bolts can fall out the back side of the sprocket when the nuts are removed so be aware of that as well. With all six nuts, bolts, and washers removed, just slide the stock sprocket off the driven flange.
Now install the new sprocket in reverse order. I had one bolt hole in my AFAM sprocket that didn't line up exactly and I had to tap the bolt a couple of times with a hammer to make it seat flush. Be aware that the sprocket bolts have a flat edge designed to rest against the lip of the wheel to keep them from spinning when you tighten the nuts. Once you have all the bolts reinstalled torque them to 47 ft/lbs (64 Nm) in a star pattern.
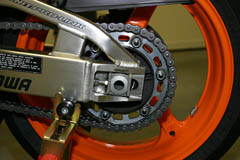
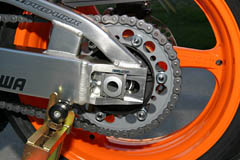
Put a light coat of high quality grease on the rear axle, and remount the rear wheel to the bike, again being careful that the rear caliper doesn't scratch your wheel. Install the chain adjusting plate and washer. Adjust the drive chain slack to between 1 inch to 1 3/8 inch (25mm - 35mm) at the mid point of the chain per the manual and tighten the 12mm lock nuts. Tighten the rear axle nut to 83 ft/lbs (113 Nm) and recheck the drive chain slack.
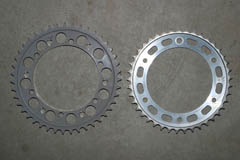
The stock 41T sprocket measured 8.375 inches (213 mm) in diameter and the AFAM 43T sprocket measured 8.813 inches (225 mm) in diameter. This makes the circumference of the AFAM sprocket 1.376 inches (35 mm) greater than that of the stock sprocket. This larger circumference is what makes a larger tooth sprocket have more oomph. This also means the rear axle will move closer to the front axle shortening the wheel base. After changing out my sprocket and setting my chain slack, the adjusting plate was right at the front of the adjusting marks on the swing arm meaning I didn't need to add any links to my stock chain.
 |
 |
 |
The difference in performance with this +2 change in the rear gear is very noticeable. The bike no longer lags what so ever during take off and I no longer have to feather the clutch leaving stops. Roll on acceleration is also much better than stock without being buzzy at highway speed. I measured my wheel base with a tape measure and found it to be right at 55 inches prior to the gearing change. After the gearing change my wheel base measured 54.625 (54 and 5/8) inches with the same tape measure. I confirmed this with calculations and, thanks to Tangogx on the www.1000RR.net board, with a very clever wheel base calculator he came up with in Microsoft Excel.
Be aware of speedometer error. The stock speedometer is off by about 7-8% which I confirmed with a GPS in my SpeedoHealer "How To". Gear changes increase this error. I highly recommend using a SpeedoHealer especially if making gearing changes. I had already set my speedometer to be exact prior to this gearing change. After installing the 43T rear sprocket my speedometer was off again by 3-4% which I adjusted with the SpeedoHealer. In order to adjust out this additional error, I just set the SpeedoHealer to transparent mode, meaning it wasn't making any corrections, and used a GPS to test my speedometer. Here were my new measurements:
|
Indicated Speed (MPH) |
GPS Reading (MPH) |
% Error |
| 30 | 27.3 | +9.89 |
| 50 | 45.4 | +10.13 |
| 60 | 54.3 | +10.50 |
| 100 | 89.1 | +12.23 |
| Average % Error | +10.69 |
The Honda speedometer isn't exactly linear. I confirmed this with the SpeedoHealer's speedometer linearity test. Due to this inconsistency I settled on a -10.8 correction factor in my SpeedoHealer which made the speedometer exact to the nearest mile per hour at each of the above readings which I confirmed with a GPS.
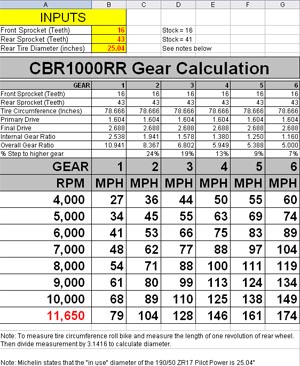
Finally, be aware that gearing changes affect your top speed. There is a gearing calculator at www.rogueracing.org if you want to experiment with various gear values to see what affect they have on RPM and speed. According to this gear change calculator I'll have the following RPM/Speed readings:
This page is part of a frame set. If you reached this page via a search engine please click here to go to the main page.