Illuminated Cup Holders
I'm somewhat of a health nut and drink lots of water and usually keep a bottle of water with me all the time, especially when driving. One problem I've always had is finding the cup holders at night. I'd end up jabbing around with the bottle of water trying to get it back into the cup holder while trying to keep my eyes on the road. To solve this problem I decided to install some accessory lighting in the form of LEDs to illuminate the cup holders at night.
I found all the components at RadioShack. The brightness of the LEDs, measured in mcd, is important as you don't want the light to be distracting. After researching some LED specs I found that the best light is between 6 and 20 mcd. Also, I found that the colored LEDs are less distracting than the clear type, so keep that in mind if you decide to tackle this project.
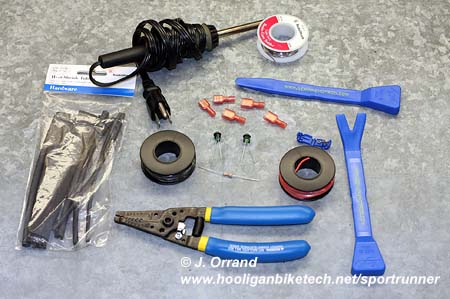
For this modification you'll need:
2 LEDs in 6 to 20 mcd - I found Radioshack
P/N 276-1622 with 20 assorted LEDs the best deal
2 5mm LED holders - RadioShack P/N 276-079
Proper resistor for LED on 12V system - I used 470 Ohm 1/2 watt RadioShack P/N
271-1115
18 gauge stranded wire in two colors - I used red and black RadioShack P/N
278-1226
18 - 22 gauge insulated disconnects - RadioShack P/N 64-3131
18 - 22 gauge ring terminal - RadioShack P/N 64-3114 (be sure this fits the bolt
you use to ground to)
18 - 22 gauge wire tap - RadioShack P/N 64-3053
Hot glue gun
Wire crimping and stripping tool
Heat shrink tubing
Soldering iron and solder
Dremel tool or file
Drill and 1/4" drill bit
Dash panel pry set - optional but makes the job EASY
1/4" corrugated wire loom - optional but recommended
Electrical tape - optional but recommended
Wire clips - optional
220 grit sandpaper and block - optional
800 grit sandpaper - optional
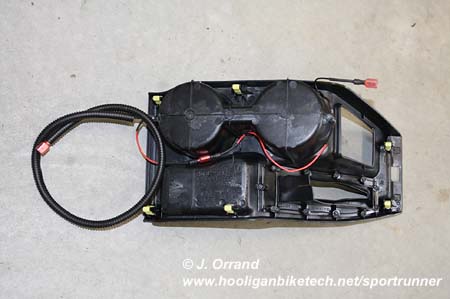
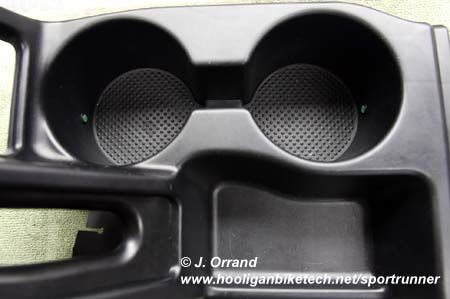
Begin by removing the cup holder portion of the center console. I used a
dash pry kit from Summit Racing which made this a snap without breaking any
support tabs. The cup holder portion will pop out of the center console
and slide over the e-brake handle. Once removed, dremel a small notch in
the ridge on the cup holder where you'll mount the LEDs at each end. Be
sure they're equi-distant from the bottom on each side so the LEDs are lined up
properly for aesthetics. Mount the LEDs somewhat close to the bottom of
the cup holder for the best lighting effect.

Next, drill a 1/4" hole to mount the LED holder in and mount the holder in the drilled hole.
I sanded my LEDs flat to diffuse the light a little more in the cup holder using a sanding block and 220 followed by 800 grit paper, but that's not required. I do think they look better as well though.
Prep the LED circuit. You'll need to determine what size resistor to use as LEDs will burn out instantly if hooked directly to a 12V source. Most LEDs are in the 2.1 to 3.0 V range with 25 - 30 milliamp currents. The following formula is used to determine resistor value:
R = (Vs
- Vl) / I
R = Resistor Value
Vs = Source Voltage (12V in our
case)
VL = LED Voltage
I = LED current in milliamps
*If there is no resistor of the exact value or R
then use the next higher resistor value available
I suggest reading up on LEDs with a Google search to understand how to hook them up if you're not already familiar. The long leg is the anode (+) and the short leg is the cathode (-) and these must be connected as such. The resistor should be soldered to the anode, the side leading to your 12V source. When soldering be sure not to leave the iron on the LED too long or you'll burn it up. Also, proper soldering technique is to touch the iron to the wire, to get it hot, then touch the solder to the wire and let the solder draw to the wire. We're wiring up the two LEDs in series, so the first LED's (+) goes to 12V, then first LED's (-) goes to the (+) of the second LED, then the second LED's (-) goes to ground. I put a quick disconnect between the first and second LED so that I could make repairs down the road if necessary without removing both LEDs. Probably over kill since LEDs last nearly forever, but I always over engineer everything. Remember to put heat shrink over the connection points as well.
|
|
|
Once the circuit is built, simply plug the LEDs into the holders mounted in the cup holders. They should snap in place. Be careful not to break the legs off the LEDs as they're some what fragile. Once the LEDs are mounted, I recommend putting some hot glue on the back to secure them in place and protect the legs of the LEDs.
Finally, connect the LEDs to power (+12V) and ground. You'll need to find a power source that only gets +12V when the parking lights are turned on so the LEDs illuminate with the parking lights. There are several place you can tap power from, but I chose the ash tray bulb wiring as it's easy to reach and work with. Simply attach the tap to the +12V wire of the ash tray light and run a wire from the tap to the first LED. I suggest making a break point with quick disconnects close to the LED so the cup holder assembly can be easily removed down the road if need be. Finally, attach the second LEDs ground to a bolt around the parking brake. Again, I suggest putting a quick disconnect in to allow easy removal of the cup holder assembly down the road. I recommend covering the wires with some 1/4" wire loom for protection. I also glued some small plastic wire clips I had on hand to the cup holder to hold the wire in place. This is totally optional as there's really nothing for the wire to hang on anyway. Some people have asked about a fuse. You could wire in a fuse holder if you want, a 2 amp would do it, but the parking lights are tied to the 10 amp tail light fuse and this includes the dash illumination which this LED circuit ties in to. In other words, it's already fused.
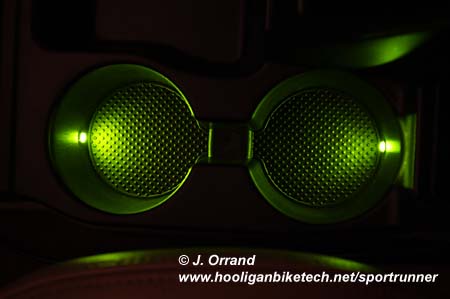
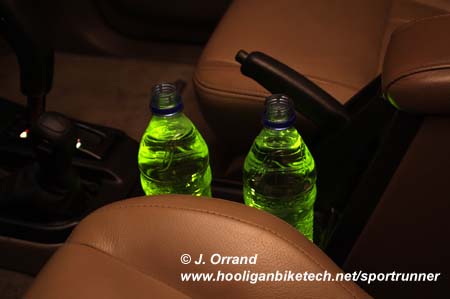
This modification takes about 2 hours to complete if you take your time. Measure twice and cut once on the wiring to be sure you leave enough slack. The mod works great and using the LEDs and resistor I've outlined in this article the lighting is perfect. Not too dim and not too bright. Bottles of water now have a nice radioactive glow to them when sitting in the cup holders and the cup holders are now easy to find in the dark.
|
|
|