

Detailing Part 1: Washing and Drying
Keeping the vehicle's surface clean is the most important step to maintaining a vehicle finish. Various contaminants attack the surface and over time will really take their toll if allowed to remain on the finish, so the first article in my Detailing Series will discuss proper washing technique. This may seem like a no brainer but you’d be surprised at how quickly improper washing will really do a number to your vehicle.
For starters use the proper product for the job. DO NOT use dish washing liquid to wash your car. Dish washing liquid removes wax and polishes and will leave your vehicle’s finish unprotected. Use a high quality car wash. I personally like Griot’s Garage Car Wash. Put the proper amount in a wash bucket and fill with water. If using the Griot’s Garage Car Wash use 1oz of car wash to two gallons of water. Warm water will work better than cold at removing contaminants.

For this maintenance you'll need:
Car Wash
Wash bucket (or two if you're really anal)
Body microfiber wash mit
Wheel microber wash mit
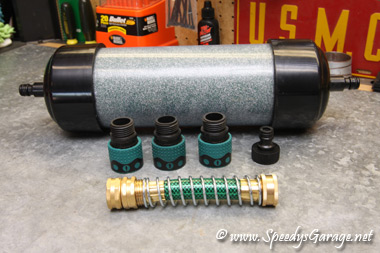
Inline water softener (optional)
Chamois, microfiber towel, paint squeegee (or all three)
Spray on Wax
Speed Shine
Difficulty Rating: 

Make sure the car’s surface is cool and in the shade if at all possible. If you can’t wash it in the shade, try to do it early in the morning or later in the afternoon when the sun isn’t beating straight down. This will help avoid the car wash drying and spotting the finish and will give you more working time. Fill a wash bucket with 2 gallons of warm water, then add the appropriate amount of car wash and blend with a wash mit. Doing things in this order helps avoid having too many suds in the bucket which can cause issues getting the appropriate water to car wash ratio. If you’re really anal you’ll use two separate wash buckets, one with car wash, and one with fresh water. You'll use the fresh water bucket to rinse the wash mit between washing sections of the car before putting it back into the wash bucket containg your car wash solution, which is the method I use on the Challenger.
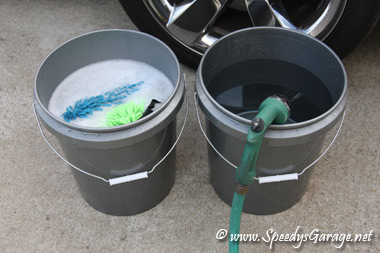
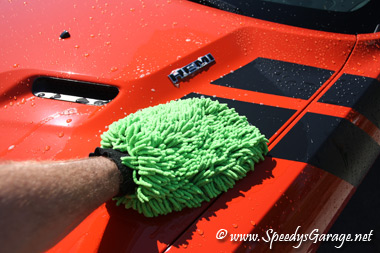
Use two separate microfiber sponges or mitts. One will be for the body, the other for the wheels and tires. Brake dust can be abrasive so you don’t want to use the same sponge to wash the car’s body that you use on the wheels and tires. This helps avoid swirl marks and scratches. Also, be careful to not drop your wash mitt on the ground. If you do happen to drop one, rinse it thoroughly with a heavy stream of water while shaking it out or better yet throw it away. You don’t want a small piece of debris caught in the sponge or mitt to scratch your entire car as you work.
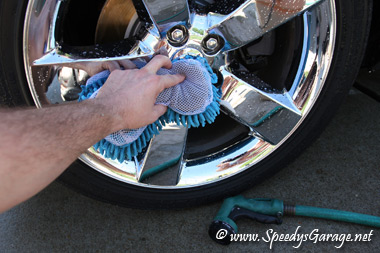
Use a strong stream of water to spray out the wheel wells and wheels. Saturate your WHEEL and TIRE microfiber sponge with car wash and thoroughly wash the wheels and tires. I know this sounds backwards, but washing the wheels and tires first allows you to finish washing the body of the car and get straight to drying it off to avoid water spots. Otherwise after you finish the car, you then have to wash the wheels and tires, rushing to finish before the car’s body begins to dry leaving water spots. Once washed, rinse the wheels and tires thoroughly and move on to the body.
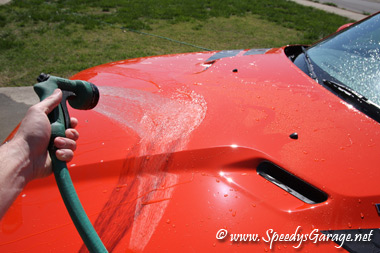
Use a strong stream of water to spray the vehicle down beginning at the top. This is to remove as much loose dust and dirt as possible. Saturate your BODY wash mitt or sponge heavily with car wash and begin washing from the top down. Work in small areas such as half the roof, or half the hood to avoid the car wash drying on the car. If you’re not able to work in the shade, you may have to work in even smaller sections. Once a small section is washed, rinse with a nice flood of water and rinse out your mitt before moving to the next section. If you come across a heavily soiled area, using a microfiber towel with straight car wash and gentle wiping should remove it. I clean my vehicle’s body in the following order: roof, hood, front fascia, front fenders, doors, rear deck, rear fenders, and rear. Think of it as going from the cleanest part of the car to the dirtiest. One last thing…I’d not recommend ever using a pressure washer to wash a vehicle. You run the risk of forcing water into places it shouldn’t go as well as damaging gaskets and seals around windows and doors. Whatever you do NEVER run your car through one of those automatic car washes unless it’s 100% touchless. Those things will really scratch up a paint finish.
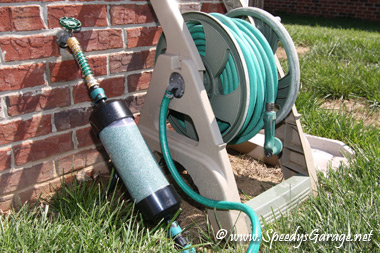
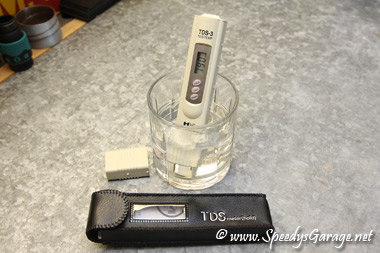
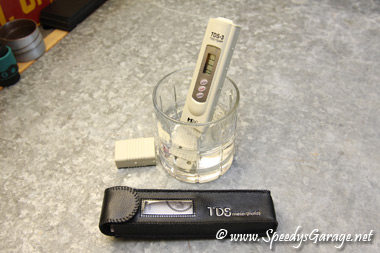
The water in my area is AWFUL. I get calcium deposits on my showers and sink sprayer that I have to use vinegar to remove. Because of this I also get terrible water spots on my car no matter how fast I move and dry the vehicle. I decided to try out one of Griot’s Inline Water Softeners to see if this would help the issue. This unit basically removes all the minerals from the water and makes it MUCH easier to wash the car without spotting. The softener is only needed in the final rinsing phase. I’m happy to report it does in fact eliminate water spots and the vehicle looks much better after washing with much less effort in drying. Using Griot’s water tester, I found my water to have a mineral deposit rating of 190ppm. After the softener the rating was 11!!! The filters are a little pricey, but worth it. If you wash a lot of vehicles, they have a larger unit that costs a little more up front, but is cheaper to refill with resin.
Once you’ve completed your final rinse, use a large microfiber towel, chamois, paint squeegee, or a combination of all three to thoroughly dry the vehicle. I use a paint squeegee and a micro fiber towel on the Challenger. This combination makes drying the vehicle 50% faster at least. Remember, these items are for drying, not cleaning. If you find them getting dirty while drying STOP. It means you didn’t wash the vehicle properly and you’ll scratch the finish. The majority of scratches and swirl marks occur when wiping a vehicle while it’s dry. This is because there is no fluid to act as a lubricant so be sure the vehicle is thoroughly clean before drying.
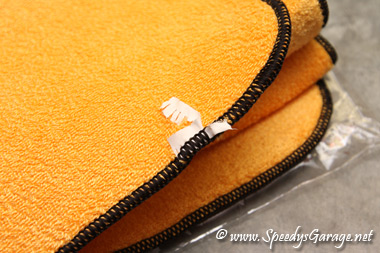
On my Challenger I go a step further and use Griot’s Spray On Wax as I dry. You just mist a little on the surface and then dry the vehicle as you normally would. This gives a nice deep glossy finish and beefs up the protection in between full waxing sessions. I have Griot’s Spray On Wax Kit which includes the microfiber towel, paint squeegee, and spray on wax. Buying them this way saves a few bucks. My only complaint is that Griot's leaves a small tag on the microfiber drying towel that "could" scratch the finish. However, it's very easy to remove.
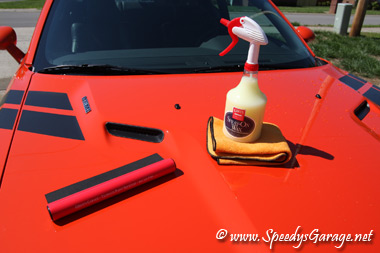
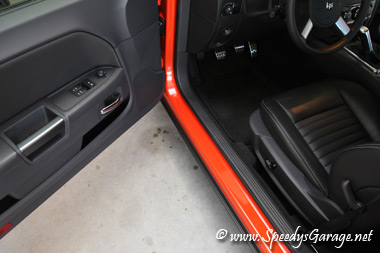
Finally, don’t forget the door jambs, trunk jambs, inner trunk lid, and under hood. I always wipe those areas down with Griot’s Speed Shine and a microfiber towel. This combo makes a great spot detailer and for those that go to car shows you can keep these items in your trunk for a quick wipe down of the whole vehicle once you're setup. It smells good too! I’d suggest getting one of their sprayers with it as well for easy application. This is one of my favorite products because it’s so cheap and effective.

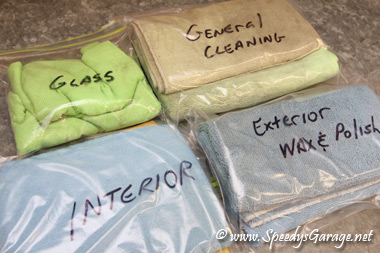
That sums up the washing portion of the detailing series. I’ve tried to outline things I’ve learned over the years detailing my vehicles and wish someone had told me when I first got started. It would have saved me a lot of frustration, saved time, saved money, and I’d have had more fun doing the work as the results would have been much better. One other tip I'll throw out there is to seperate your microfiber towels by purpose. For instance, seperate general cleaning towels from Speed Shine detailing towels.
I’ve mentioned several products I use in this article. These are the ones I’ve found to be the best at what they do. However, this article will apply no matter what products you use.
Now that we’ve got the car clean, we need to move on to polishing and waxing.