|
|
|
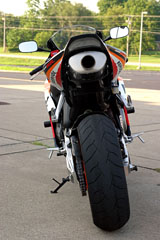
Honda CBR 1000RR Arata Titanium Slip On
July 2005
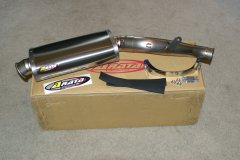
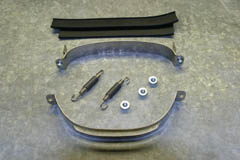
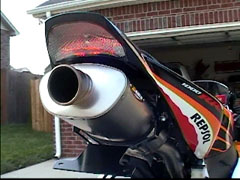
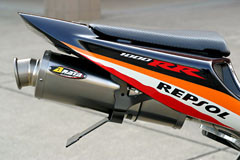
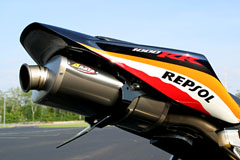
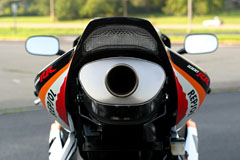
Arata has released a new style exhaust can for the CBR 1000RR and I love the way it fits the bike. I ordered one of these Arata Slip Ons from www.superbikesupply.com and had it in my hands a few days later. I was happy with the Jardine Ti Slip On, but having read and heard about how great the Arata systems were I had to see for myself. I didn't go with Arata originally because their previous design exited the 1000RR crooked. This new can has a nice box style shape and exits the bike perfectly straight. The system arrived well packaged and included a simple but very effective mounting solution that consisted of two clamp halves with 5mm hex bolts, two silicon strips, three 12mm nuts, and two springs. The system was very high quality with a lot of attention to detail all the way down to silicon sleeves over the springs. The one thing missing were instructions, which I presume hadn't been translated from Japanese at the time this initial shipment of Arata systems left Japan. The missing instructions were a non issue, however, as installation was very easy, especially if you've ever worked on the 1000RR exhaust before.
|
|
|
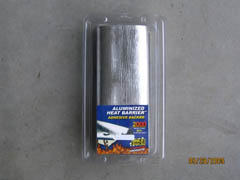
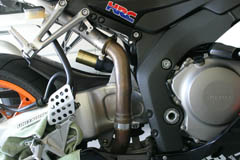
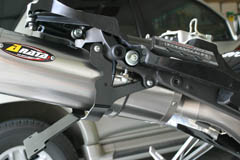
To install this new Arata Slip On you'll remove the 1000RR rider and passenger seats, tail section, rear fender assembly, right rear set, end can, connector pipe, heat shields and exhaust valve cables. One thing to watch out for is the black bolt near where the tail section bolts to the frame. This bolt goes through the frame and attaches to the exhaust and is easily missed. I recommend reviewing the maintenance manual before removing the stock exhaust as there are quite a few little bolts and screws holding it in place, not to mention disconnecting the exhaust valve cables. Once you have the stock exhaust and heat shields removed I recommend putting some Cool-It or similar material on the under tray. This material is light weight, good to 2000 degrees F (1093 C), and adhesive backed. Use a plastic putty knife to get it to form to the shape of the under tray. This will allow you to leave the stock heat shields off the bike.
|
|
|
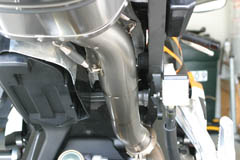
Next simply connect the stock connector pipe to the Arata down pipe and attach the assembly to the bike using the stock clamps, gaskets, 12mm bolt and supplied 12mm Arata nut that passes through the frame to the tab on the Arata down pipe. Don't tighten anything up just yet as you'll need some play in the pipes to get everything lined up. Next install the upper exhaust can clamp to the bike at the stock can mounting locations using the stock exhaust can bolts and supplied Arata 12mm nuts. If you have large hands you may need to get someone with smaller hands to help as getting the nuts on the bolts could be challenging. Attach the upper silicon strip to the upper exhaust clamp and slide the Arata can onto the down pipe making sure it completely seats. Install the lower exhaust clamp and silicon strip using the supplied Arata 5mm hex bolts. Finally attach the springs from the Arata can to the Arata down pipe. Once you're sure everything is lined up satisfactorily, tighten all the bolts including the stock clamps on the down pipe and connector pipe. Start the bike and check for leaks.
|
|
|
|
|
|
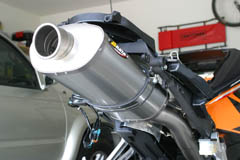
The new Arata can is light weight, beautifully crafted, and the quality is top notch. I've had other high end exhaust systems, such as Sato and Akrapovich, but this Arata seems to take the cake. The titanium used in this system is outstanding with absolutely NO blemishes what so ever. The welds on the end can and down pipe are superb, and the down pipe is polished smooth on the inside at the welds. This exhaust also sounds great. The idle is nice and deep with a good rumble from 3,000 RPM to 4,000 RPMs. It's just enough to let people know you're there when cruising, however twist the throttle and you'll swear you're riding a factory super bike as the exhaust note becomes quite prominent above 8,000 RPMs.
|
|
|
|
The entire Arata slip on including all mounting hardware weighs just 5.04 lbs (2.29 Kg), however this system does not replace the entire down pipe from the end can to the 1000RR collector. This Arata slip on re-uses the stock connector pipe that weighs 1.12 lbs (0.51 Kg) bringing the total weight of the Arata slip on to 6.16 lbs (2.80 Kg). Even though Arata re-uses the stock connector pipe it is still lighter weight than Sato's 1000RR slip on which replaces all the stock pipe with titanium parts all the way to the collector. The Sato slip on weighs 6.25 lbs (2.84 Kg) vs. the Arata at 6.16 lbs (2.79 Kg). The Arata is only 1/10 of a pound lighter, but I was surprised considering the stock stainless steel connector pipe is re-used. My Jardine weighed a tad less than the Arata at 5.46 lbs (2.60 Kg).
The Arata quality and attention to detail come at a price as this slip on system costs more than some other slip on systems. I had a discussion with a representative from Center of Gravity (www.arata-ex.com) regarding this new system and was told it's not only the external quality but internal quality that should be considered. This can uses higher end packing than most systems meaning it will last longer. Design engineering also seems to have been very well thought out. The Arata down pipe starts at 1.875" (48 mm) and gradually opens up to 2.375" (60 mm) at the point it enters the end can. This is accomplished via four separate pieces of titanium pipe that gradually get larger in size. The end can exhaust exit is also 2.375" (60 mm). In contrast the Jardine was 2.25" (57 mm) all the way through. The Arata end can is 19 inches (48.26 cm) tip to tip with the can sleeve being 12.75 inches (32.39 cm). The Arata end can is 7.5 inches (19.10 cm) wide.
|
|
If I were able to change anything about this system it would be to have Arata spot weld the three included 12mm nuts to their mounting locations on the Arata mounting hardware. This would make installation easier as you'd not have to try to hold the nuts in tightly confined spaces while inserting the bolts. I'd also have the stock connector pipe replaced with a titanium part to save even more weight with the system not to mention the bling factor of titanium down pipes.
I had to modify my Jardine Fender Eliminator ever so slightly to make it fit with the Arata system. The bracket that holds the end can in place is just too wide for the Jardine FE to fit. I used a dremel tool with a cutting wheel to trim off some of the material to allow it to fit and used some gloss black touch up paint on the cut sections. The only down side to trimming this area is the Jardine FE will no longer support turn signals unless you can find a new area to drill mounting holes in the unit. Trimming the material off of the Jardine FE removes the area where the turn signals attach. This was a non issue for me since I use a Clear Alternatives Integrated Tail Light on my bike.
I've put 150 miles on this system so far and it seems the exhaust note has deepened ever so slightly in that time. I'm very happy with the system and to date this Arata has been the nicest system I've owned. This page will be updated soon to include dyno run information on this system. I hope it performs as well as it looks.
This page is part of a frame set. If you reached this page via a search engine please click here to go to the main page.