"How To" DVD available for this modification
Honda CBR 1000RR Easy Flapper Modification
"How To" DVD available for this modification
August 2005
Everyone likes freebies right? Especially in the power delivery department. In a time where horsepower typically cost $100 US per, it's nice to find ways to add ponies for free. The flapper modification is one of the easiest and most cost effective modifications that can be made to the CBR 1000RR. There is a plastic "flapper" door mounted in the front of the intake. The flap only operates with the bike in gear, load on the motor, and the clutch engaged (i.e. as if you were riding). You can not see the flap open and close with the bike up on a stand. If you look at the front of the bike just behind the front forks this flap is visible behind a small screen above the radiator. The flap remains shut at lower RPMs and is yet another emissions device that Honda put in place to meet noise limitations. This flap opens above 5,600 RPMs similar to the exhaust valve. The problem is that while this flap is closed the motor is forced to breath through two small openings on either side of the flap robbing the motor of low end power.
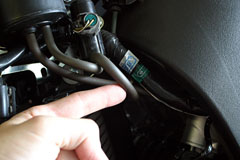
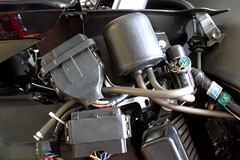
Disabling this flapper is very simple. You simply pull the vacuum hose off the gold flapper diaphragm valve and plug the vacuum hose with a suitable object such as a finely threaded screw. You don't have to remove any fairings to complete this, but I did to give me more access and allow me to secure the vacuum hose to the electrical wiring behind the fuse box. The hose is visible from the left side of the bike through the upper opening in the fairing. If your hand is small enough simply reach in and pull it from the diaphragm valve, just be careful to wriggle it loose so as not to dislodge the diaphragm valve. Once you have the vacuum hose plugged, secure the object in the hose with a zip tie, then zip tie the hose securely and safely out of the way of hot engine parts. You can also unplug the electrical connection from the solenoid to accomplish this modification, but I feel the vacuum tube method is the better way to go as you don't have to worry about water getting into any open electrical connections.
|
|
|
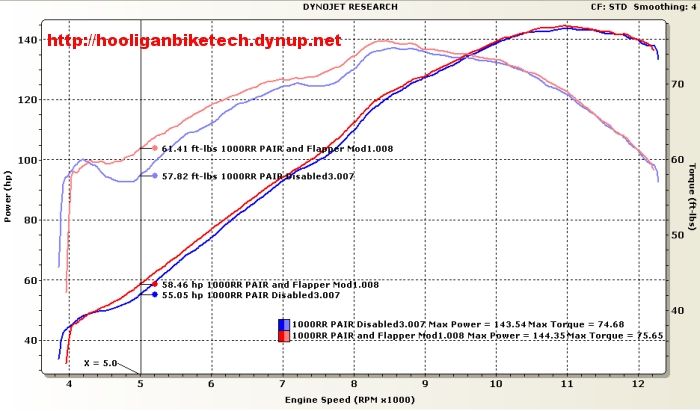
I tested this mod on the dyno and as you can see from the graph below it definitely makes a difference. The bike feels much less labored at lower RPMs and takes off much smoother. The induction noise was not noticeably louder to me, however I have an Arata Slip On exhaust so I don't hear much else. The dyno graph below shows my stock 1000RR with the PAIR system disabled compared to my bike only with the flapper disabled. Both dyno runs were done on the same day, same bike, same dyno, with the same operating temperature range. With the flapper mod, the bike gained over 3HP and 3 ft lbs of torque in the lower RPM ranges from 4,400 RPMs to 7,200 RPMs and the curve smoothed out as well. Not bad for free horse power especially since this modification is so simple.
You can take this one step further and completely remove the flapper assembly and associated components. This requires removing the front fairings, tank cover, and air box as well as lowering the radiator. I've not attempted this myself, but others tell me it's a real chore as the intake is held in place by lots of little hidden screws. I may end up doing it at some point, possibly over the winter, but for now plugging the hose is good enough. Removing the parts entirely doesn't gain any performance over plugging the vacuum hose outside of losing a pound or so of weight.
This page is part of a frame set. If you reached this page via a search engine please click here to go to the main page.